Have you ever wondered, “How does the computer boot? How does the OS know what to do when”? Well, I did too, and so took it upon myself to… develop an OS.
Intro
Well, when I say “develop an OS”, I mean that I started writing something that could boot into an emulator. I didn’t do much planning, but there are some goals I had in mind:
- Boot with the ability to print stuff on the screen
- Read/write to a file system
- React to user input
- Don’t crash
- Maybe start my own programs that aren’t embedded in the OS?
You might see this list and think, “wow, that’s a small list with half of it being obvious!” And to that I say, yes. But no. It’s hard, since you don’t have anything. You have to do everything yourself (or copy-paste from others, but that’s not my goal, since I just want to know how the early stages of the OS work).
When you want to start OSdeving, you need to think to some things too:
- Where is the documentation you will get? For me, I used OSDev.org, which is… a site for OS developers. (Though, much of how you do stuff is left to your own researches.)
- What architecture will you focus on? For me, the x86/amd64 will be it since it is also the focus of the site I used.
- At what stage do you start? You can try writing an OS that starts immediately after boot, in which case you need to load your entire OS since the BIOS only loads a mere 512 kio of it, or you can use an external/your own bootloader, that will load the OS and maybe do some other stuff. For me, I decided to use GRUB while my bootloader doesn’t support Multiboot (and since I didn’t start writing it, it’s a long way until I use it…).
- If you use another bootloader (which in my case, I do), which one? What do you expect from it? In my case, since it’s GRUB I use its Multiboot support to… well, use multiboot.
- What will you use to test it? (Hint: an emulator.) For me, I chose QEMU (though some use Bochs instead).
- Where do you want the OS to be at? For me, I chose 0xC0000000 for 32 bits (I have plans, maybe, for 64 bits, but that will be for later). This means I have a higher-half kernel (which is like Linux).
And with all of those questions settled, it’s time to boot.
Disclaimer: I am learning as I go. This is my first time, and this article is not supposed to be “the” way to go. It is very likely not an optimal, good nor secure way to write an OS. This is only a hobby OS tested on emulators, use at your own risk.
The tools I used have been setup according to OSDev’s tutorial on setting them up.
This article assumes you know some “basic” things about the inner workings of a modern x86 computer, namely what “ring”, “userspace”, “kernelspace”… vaguely means, as well as what the stack is at the processor level and what registers are. This is not a tutorial either, only the “main” guidelines I used.
The booting sequence
So, we are at the beginning of _start. What now?
From the multiboot specification, we know what we can expect from our environment. So, the first thing we can do is check we have been booted from a multiboot bootloader. My philosophy writing the OS is: don’t assume, check. And if it fails, crash.
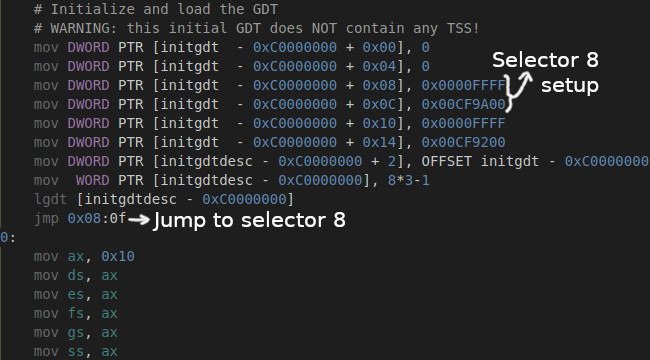
Now, we know we can trust the specification, so the first thing to do is make sure we don’t suddenly crash due to an external perturbation. So, we need to create a Global Descriptor Table.
A GDT is a table which is used by the CPU for what’s known as segmentation (though it’s been deprecated on modern CPUs). A segment is made up of two things: an offset and a limit. Historically, this was made to be able to access the whole 1 Mio of data: with 16-bits registers, it is impossible to go above 65535. So, to get the address in linear space, you do “segment offset*16 + register offset”. Afterwards (even since the 80286), it was also used to protect data: the code segment (cs) has a selector that has execution enabled, an offset to the beginning of the executable part of memory and a limit to the end of this segment, the data segments (ds, es, ss…) points to read/write-able portions of the code… However, for my OS they are basically useless (there is no offset, the limit is set to its maximum and there is no restriction).
For my OS, there are actually two GDTs: one is for immediately starting the OS, and one is for when most of the setup has been done. So the first GDT contains only the bare minimum, and then I reload all of the segments.
Next on the list, is paging.
Paging
What is paging?
Well, a computer has a lot of RAM available. However, where all of it is put is somewhat kind of semi-random. There is a (mostly) well-defined area below 1 MiB, but above that (the “upper memory”) it’s a mess. There may be memory holes, or some RAM may actually be memory-mapped I/O (not actually RAM), and so on. (As a side note, this distinction dates from the MS-DOS era; the lower memory was all that was available then.)
However, all executables we start (in userspace) can share the same memory addresses without actually reading and writing to the same area in RAM, and even allocate the whole 32GiB of addresses without crashing (-ish).
Paging is the way OSes can do this magic. Paging is the way the CPU (actually, the MMU) knows that “this address in linear space” is actually “this address in physical space“.
So, for the OS to be higher-half, since GRUB loaded it “somewhere”™, we actually need to enable paging, then jump to the correct address.
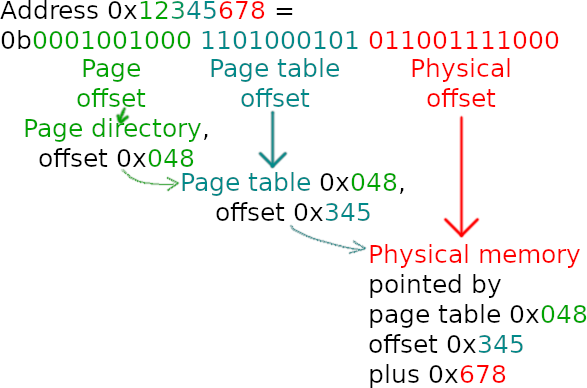
How does paging work? Well, an address is a 32-bits number (in 32 bits, or protected mode, since this is the focus of the OS). You can then decompose this address into 3 parts: 10 bits, 10 bits and 12 bits.
The 10 most significant bits are an offset into the page directory. This page directory points to a page table. The next 10 bits are the offset into this page table. This page table points to a physical address. The final 12 bits are an offset from this physical address. Of course, elements of both the page directory and page table have additional flags to mark pages as present, writable, accessible from userspace, etc.
To be more precise, I decided to use a technique called recursive mapping. What that means is that the last page (or rather, it could theoretically be any page, but for convenience’s sake it’s the last one) points to the page directory. So, addresses 0xFFC00000 to 0xFFFFFFFF are actually the page tables and the page directory (for the last page).
This is made by setting the last page table to point to the first page table, and then setting the last page table as the page directory: when accessing address 0xFFC00000, the MMU will then read offset 0x3FF in the page directory: this is the beginning of the page tables. Hence, recursive mapping (reading the last page is the same as reading the page directory).
In fact, you can make the base address of the recursive mapping in linear space whatever address you want, as long as it is 22-bits aligned: just set the entry in the page directory you want to the address of the page directory you want. However, it is better (in my personal opinion) to put it either at the very beginning or at the very end of the address space, or maybe at the beginning of the kernel space.
You can choose to manage permissions here or later, after the jump (or never). Paging allows to restrict write permission, which can be a good idea to set up. I chose to do it after the jump since I tried to keep the initial startup sequence as small as possible.
In any case, don’t forget that you may want to access the lower memory, so in my case I also identity-mapped the first megabyte. Also, when you enable paging, don’t forget that you still need read permission in the currently executing page! Otherwise, you will soon triple-fault.
Exceptions and the IDT
Now that paging is enabled and we are somewhat more stable, we still need to manage interrupts.
What are interrupts? Interrupts are the way the CPU signals the kernel about a problem that happened somewhere. It can range from a request from userspace to a page fault, passing through double faults and timers, to only name a few.
So how does the CPU know where to go? Well, the CPU has a lookup table. This is called the Interrupt Descriptor Table, and its structure is a bit weird for historical reasons.
However, every interrupt has an identifier, an offset in this table. When an interrupt happens, the CPU will decode the corresponding entry, and then setup its internal state (segments and stack, mainly) and jump to a given address (that was setup by the OS previously).
But, in the current state the OS is in, all the CPU has is an invalid pointer to an invalid address. So, if, for example, you were to setup paging incorrectly, you try to execute (read) some instruction but the corresponding page is absent. No problem, the CPU raises a #PF (offset 0x0E). But, when the CPU goes there, there is another page fault! The CPU cannot execute this address. So now, there is a problem. The CPU raises a #DF (double fault, 0x08). Uh-oh, another page fault!
This is the triple fault: in this state, the CPU aborts everything and just resets. On a real computer, this means it reboots. On emulator, depending on the settings it can just shutdown or reboot. And since it’s the initialization code, that means an infinite reset loop.
To fix this, you just need to create the IDT. Once this is done, put a handler at offset 0x0E, and you’re done! Now you can put debug informations on the screen though address 0xB8000 (VGA mode 3 text buffer), then halt execution. Or try to handle the error and return if you can.
Either way, this is also the place to manage other interrupt sources like the PIC or rather, for multiprocessing, the APIC. (This is in my TODO list.)
A few more things
Great, now the computer won’t immediately crash once you do anything!
However, the computer is still not completely initialized.
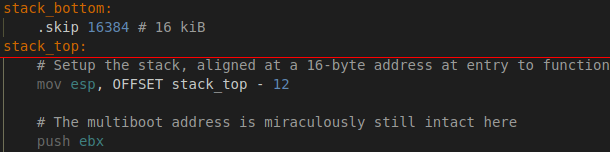
Remember the stack? You need to create it, and it’s best if it’s page-aligned. Also, now is a good time to make sure the multiboot header is still available in ebx. In my case, it was, but if it isn’t, you need to save it in another register so you can push it to the stack. We’re almost ready to (temporarily) leave assembly! However, make sure your stack is 16-byte aligned. If the stack is 16 kiB in size and it is 16-bytes aligned, you need to get the address of the top minus 12 to respect the System V ABI (or create your own ABI and don’t bother with it… I don’t recommend it though).
Something else to note is that now, you can boot to C… minus floating-point math. You need to enable the FPU before using those floats and doubles. Of course, only if it is available. And of course, if it isn’t crash with a scary warning message that says “FPU IS NOT AVAILABLE” with a nice sky blue background and blood red text.
What now?
Congratulations, you can now call a C function!
Of course, you are absolutely not free from assembly. You still need it for, for instance, enabling multithreading, lock instructions, interacting with the BIOS and so on.
However, you are now completely set up for C programming! You can now try creating functions to write strings to the terminal, or even write 383 lines for a printf-like function that doesn’t require any heap allocations. Since the heap doesn’t exist yet. What’s left now is the entire C library, being able to drop down to ring 3 and a few other little things, like changing to a high resolution graphical mode.
So, what’s next first? Personally, I’d say that memory management is first. You may survive with statically allocated memory, but it’s still best to be able to have a malloc function. That’s what I tackled next in my OS development, and that’s what will be in the next part.
If you have any suggestion for the format or what to write on next, please let me know in the comments.
One reply on “A peek at OS-deving part 1: booting”
[…] 25, 20211 min read admin submitted by /u/rajdakin [link] […]